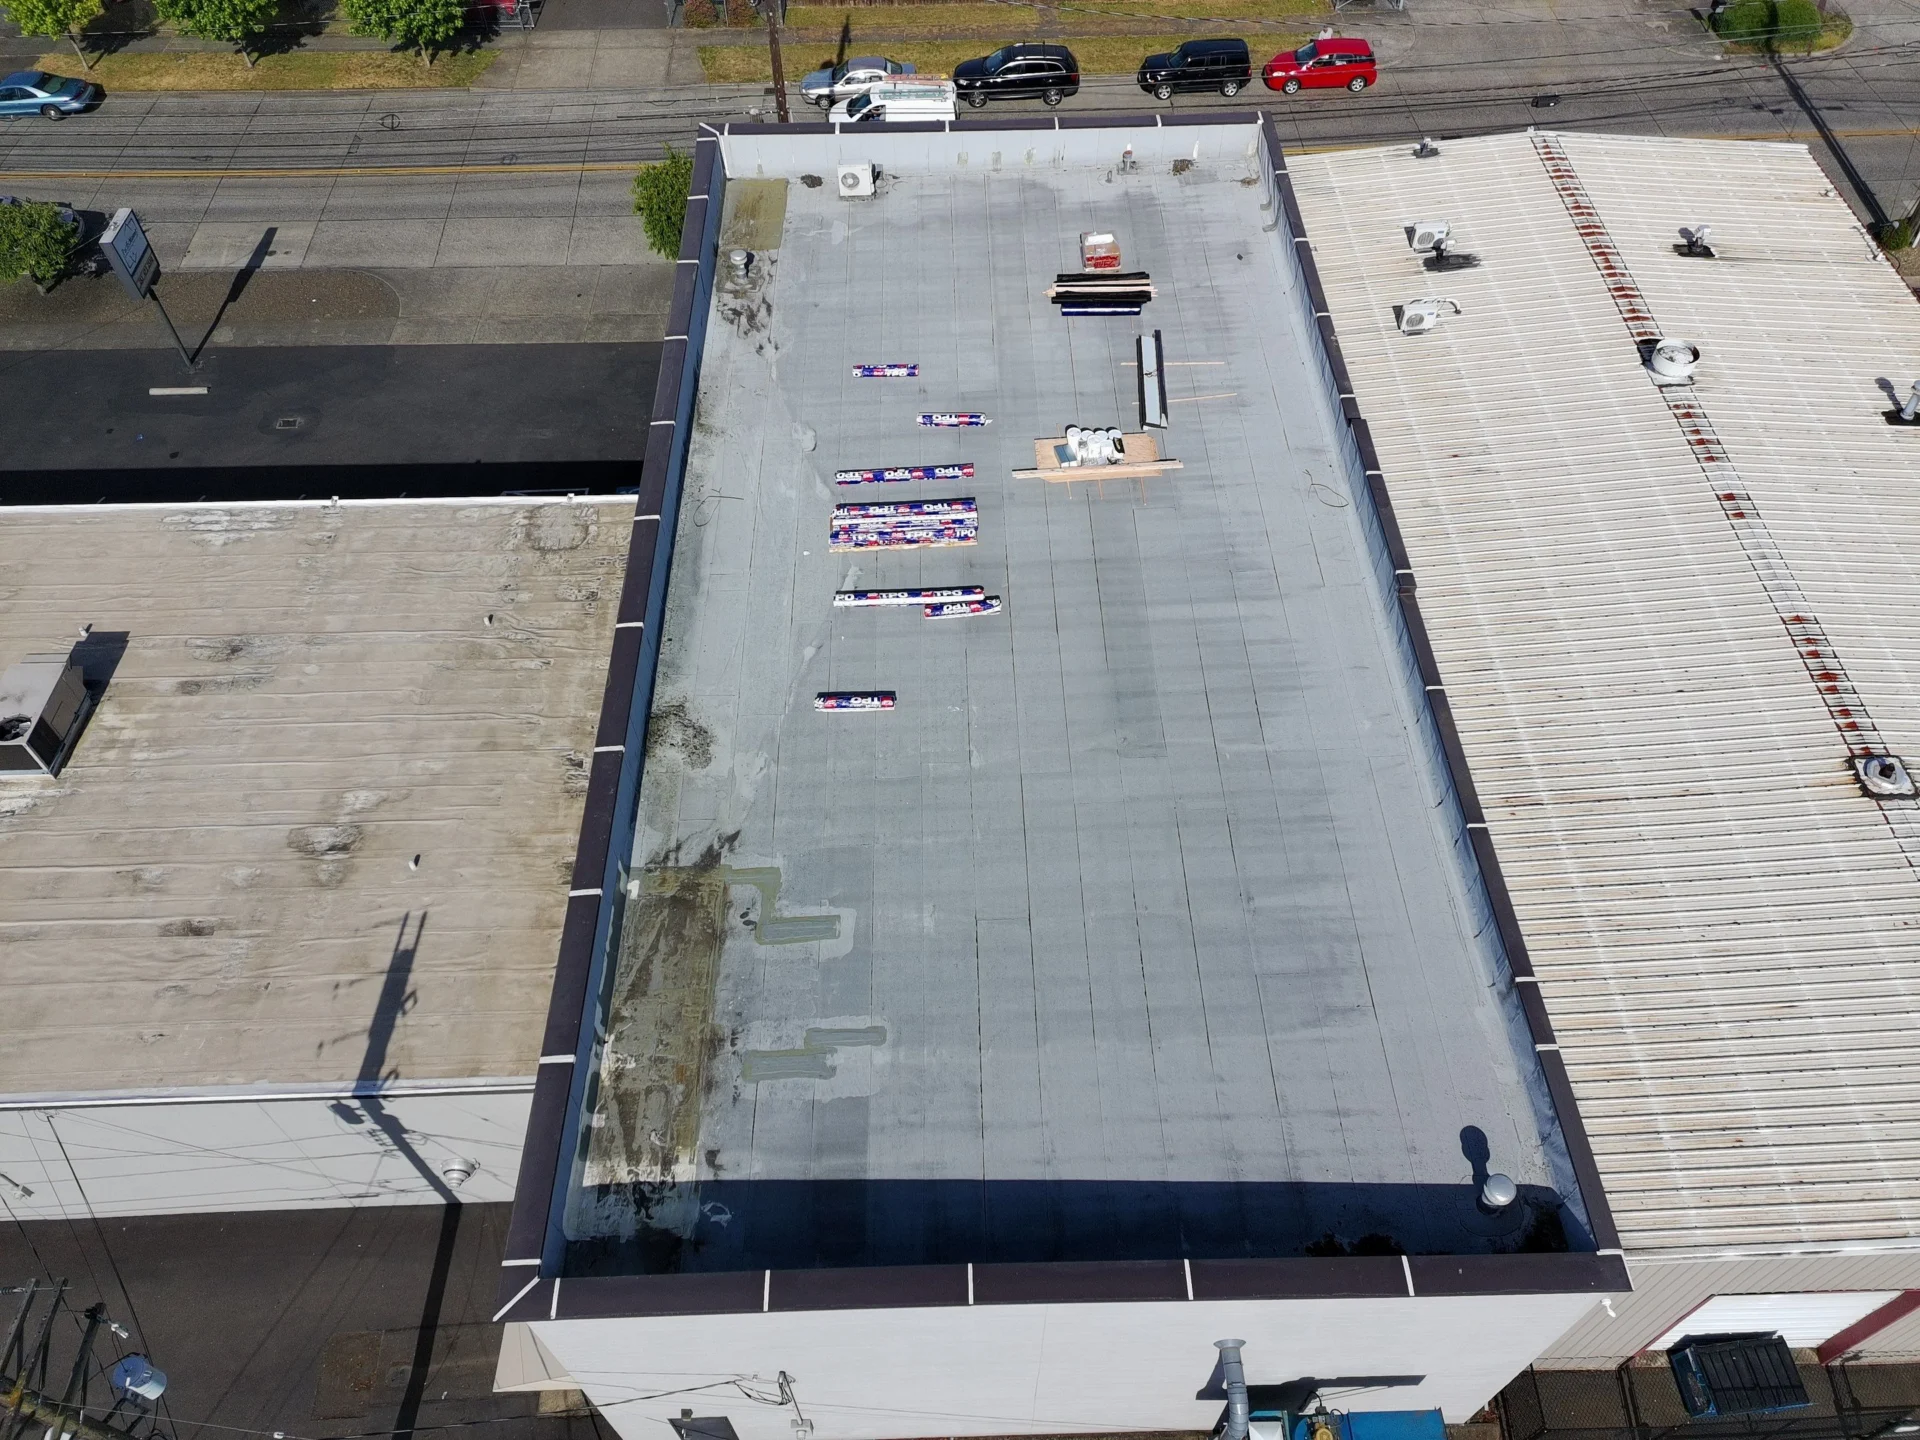
Every commercial roof inspection typically leads to one of five recommendations: routine maintenance, targeted repairs, a roof coating, an overlay, or a full tear-off and replacement. That recommendation can determine your budget, project timeline, and how much coordination may be required with tenants or building occupants. With that much riding on the findings, a thorough inspection matters.
In the Seattle area, commercial roofs face a particular challenge: persistent moisture. Seattle-area roofs sit under 163 days of measurable precipitation a year, according to NOAA’s 1991 to 2020 climate normals. Yet only about 4.2 of those days bring an inch or more of rain. In other words, it’s often not a single major storm that exposes a vulnerable roof—it’s repeated wetting over time that finds weak seams, deteriorated flashing, and other points of water intrusion.
Key takeaways
- A commercial roof inspection typically points to one of five paths: routine maintenance, targeted repair, coating, overlay, or full tear-off and replacement. Existing roof layers and substrate condition help determine which options are viable.
- Ponding water has a specific definition. The U.S. Army’s ROOFER protocol considers water that remains on a roof 48 hours after rainfall to be ponding.
- The source of a roof leak is often not directly above the interior stain. Water can travel along insulation, decking, structural components, or other pathways before becoming visible inside the building.
- In Washington, fall protection requirements can begin at four feet, which can affect how a commercial roof inspection is accessed, staffed, and scheduled.
- Manufacturer warranty claims often depend heavily on documentation. Missing inspection, maintenance, and repair records can complicate a claim even when roof damage is evident.
What a commercial roof inspection is actually deciding
Every commercial roof inspection we do in Greater Seattle starts with the same basics:
- what type of roofing system is in place
- how many roof layers are present
- what condition the existing roof is in
Those three factors help determine which options are actually available—whether that means routine maintenance, targeted repairs, a roof coating, an overlay, or a full tear-off and replacement.
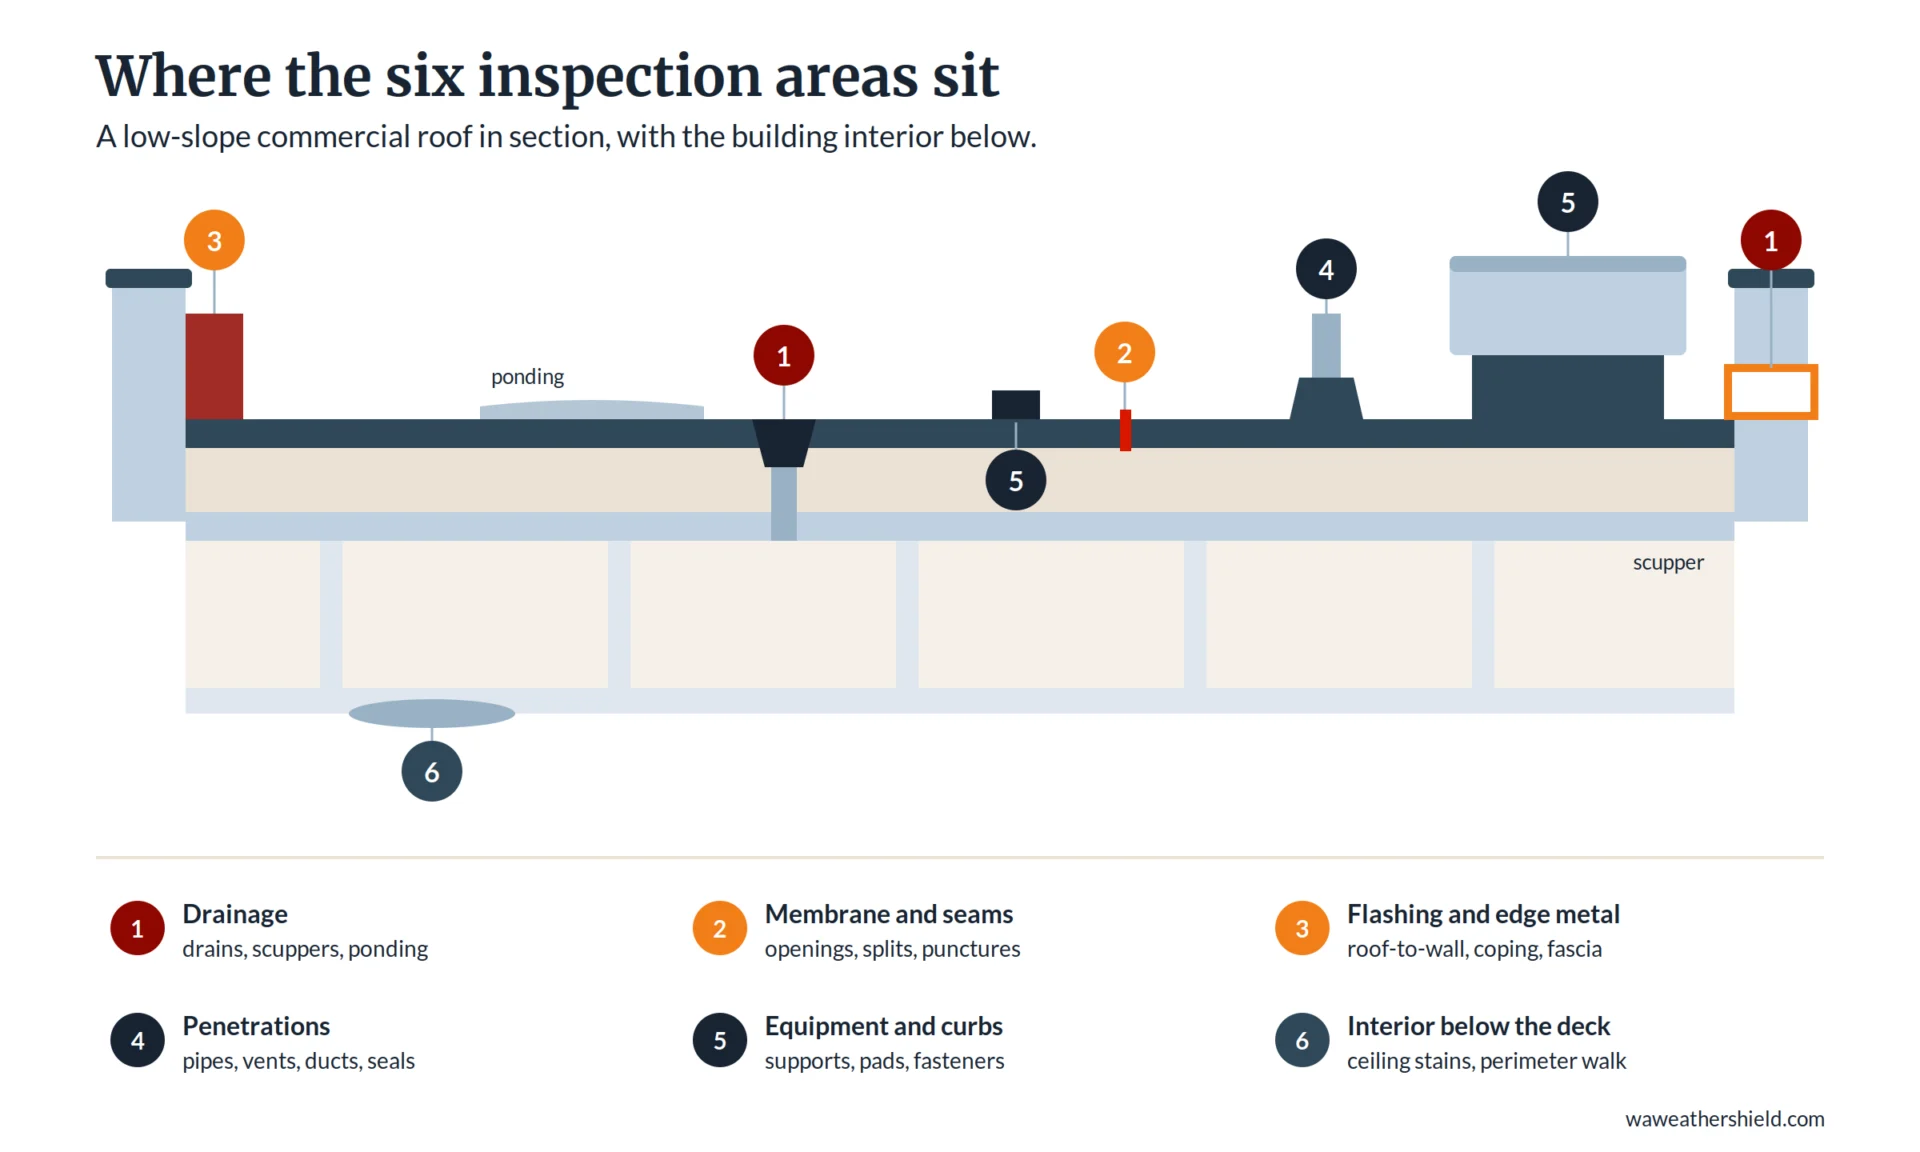
From there, we inspect the areas most likely to contribute to leaks or premature roof failure, including drainage areas, seams, penetrations, flashings, and previous repairs.
Layer count and the condition of the existing roof can eliminate certain options early. For example, if a building already has two roof layers, another overlay may not be permitted under local code. Even when an overlay is allowed, the existing roof and underlying substrate still need to be in suitable condition to support the new system.
“We regularly inspect roofs where an owner has been told they need a full tear-off, only to find that an overlay is still a viable option.”
- Ivan Prokopets, Owner & CEO, Washington Weather Shield
Don’t wait for a leak to trigger an inspection
NRCA notes in its maintenance advisory bulletin that most building owners wait until a leak occurs before having their roof system examined.
By that point, some of the less expensive options may already be off the table. Water can travel through a roof assembly before it becomes visible inside the building, potentially affecting insulation, decking, and other components along the way. If enough moisture is present within the system, a coating or overlay that may have been viable earlier may no longer make sense without additional repairs or removal of damaged materials.
The inspection still tells you where you stand – but catching problems earlier usually gives you more options.
Who should perform a professional commercial roof inspection
A professional commercial roof inspection should be performed by someone who can identify the existing roofing system, assess its condition against clear criteria, and explain what needs attention now versus what can reasonably wait.
The inspector should also understand any manufacturer and warranty requirements tied to the roof. If warranty work may be needed, confirm that the contractor is approved or authorized by the applicable manufacturer.
Just as important, a good inspector should be able to turn their findings into a clear next step – not simply hand you a list of problems. You should come away understanding the condition of the roof, which issues are most important, and what options are available.
Before hiring a contractor to perform any recommended work, ask for proof of current liability insurance and workers’ compensation coverage. This helps confirm that the contractor has the appropriate coverage in place before work begins on your property.
What Washington requires on the roof
Washington has stricter fall-protection rules than the federal standard. Under WAC 296-880-20005, fall protection generally begins at four feet.
A basic visual inspection may qualify for a limited inspection exemption when the inspector is only assessing conditions, measuring, or looking for damage without removing roof components.
Once the inspection becomes more invasive, such as lifting flashing or cutting a core sample, additional fall-protection requirements can apply. That is why a diagnostic inspection may need to be scheduled and staffed differently from a simple visual survey.
What gets inspected on a commercial roof
Drainage, scuppers, and ponding
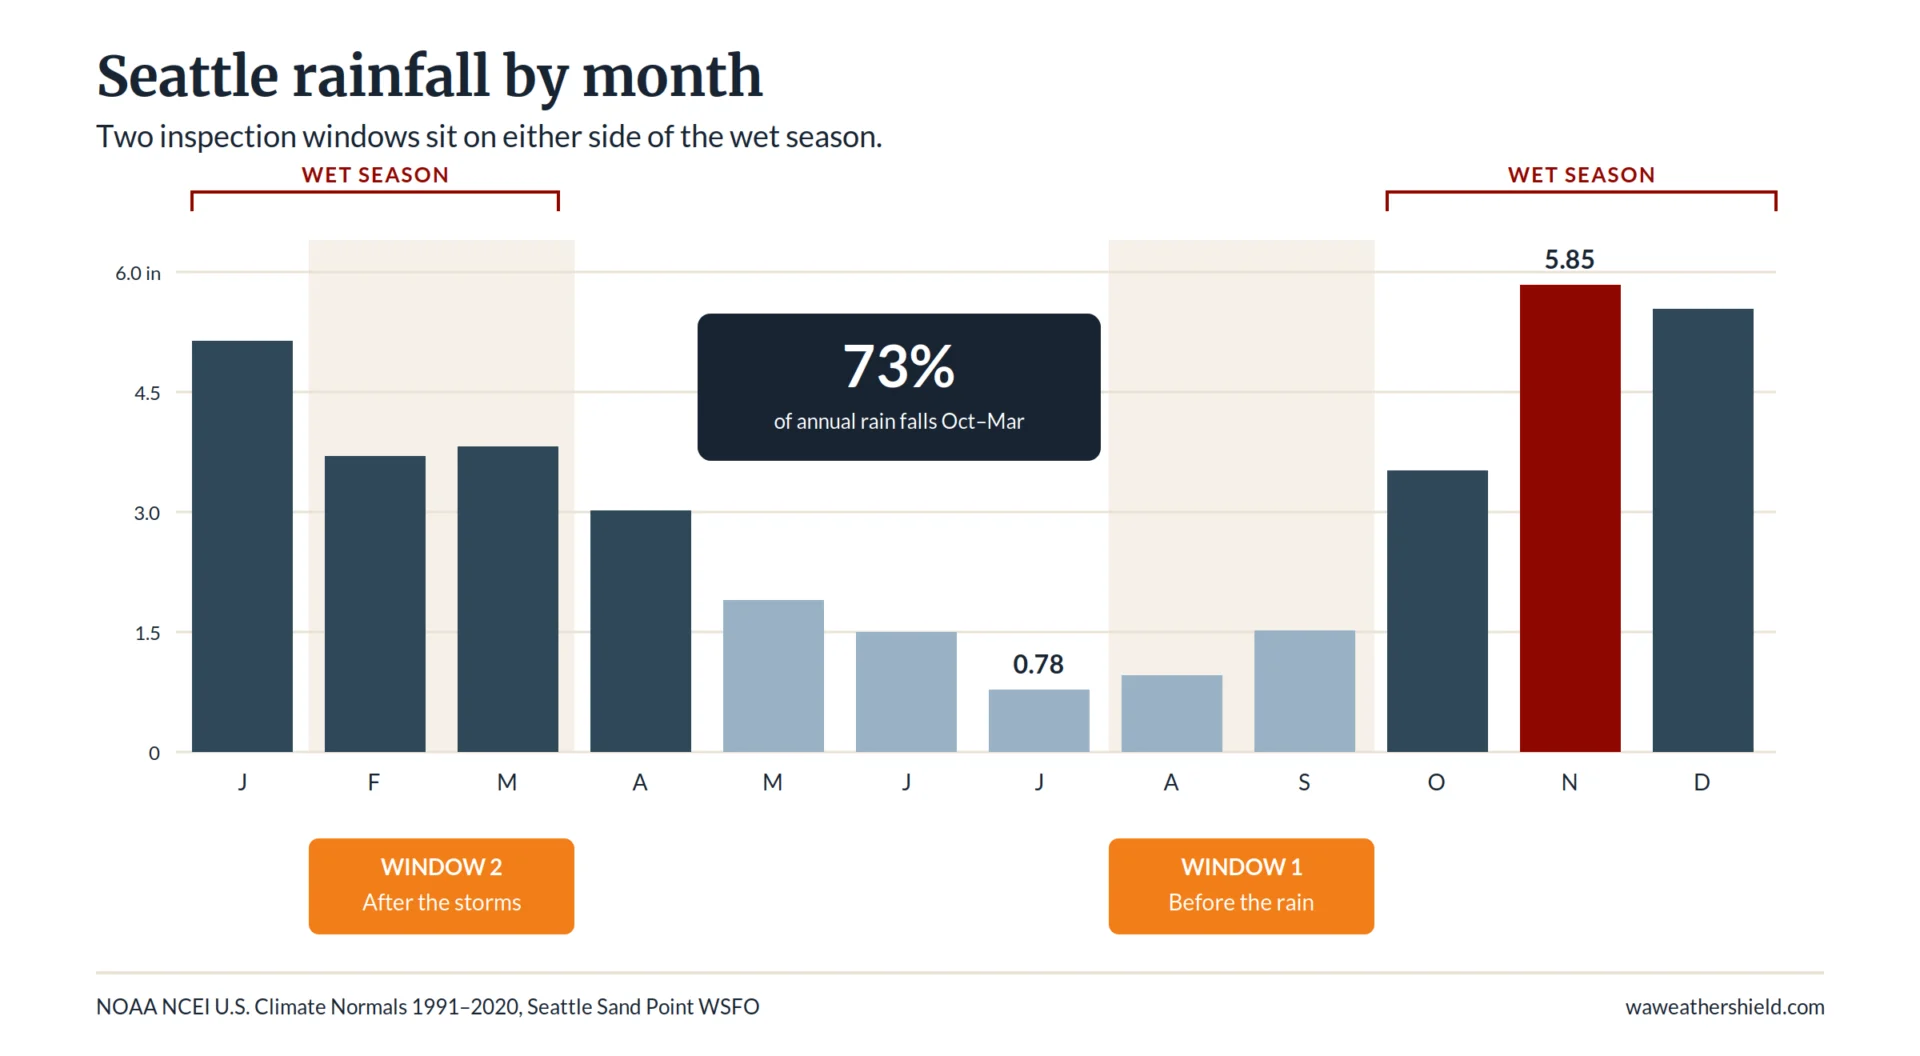
Drainage is one of the first things we check on Seattle-area roofs because of the region’s long wet season. NOAA data shows that Seattle receives 27.59 inches of rain from October through March, about 73% of its 37.82-inch annual total.
The inspector should check where the rainwater goes: roof drains, scuppers, gutters, downspouts, and low areas where water collects.
Standing water becomes a concern when it remains on the roof for more than 48 hours after rainfall. That is the threshold used in the U.S. Army Corps of Engineers’ ROOFER inspection protocol.
We often see the consequences in spring: clogged drainage, failing sealant, or small punctures that would have been relatively simple to address before the wet season.
Membrane condition and seam integrity
Seams fail in stages, which is why they get rated rather than passed or failed, and ROOFER inspection protocol sets the criteria at three levels.
- Low severity: the seam opening is less than half an inch.
- Medium severity: the opening is half an inch or more, but the seam is still watertight.
- High severity: the seam has opened through its full depth, or there are holes or splits that give water a direct path into the roofing system.
The goal is to catch these issues before water gets beneath the membrane. Once moisture gets in, it can spread through the insulation or roof deck and travel before it becomes visible inside the building. On a Seattle roof that stays wet for much of the year, a small seam issue can become a much larger problem if it remains through the rainy season.
Flashing, edge metal, and penetration seals
they are common points of failure. Loose or deteriorated flashing and failing sealant are among the issues we regularly find, and both are typically much easier and less expensive to address when caught early.
Penetrations also get extra attention because each one creates an interruption in an otherwise continuous roofing system. We closely inspect drains, vents, stacks, ducts, and equipment curbs for issues such as tears, deteriorated flashing, loose components, and open or failing seals.
Rooftop equipment, curbs, and traffic areas
Rooftop equipment and its supports also need to be inspected closely. Pipes, mechanical supports, and equipment that rest directly on the roof membrane without proper protection can cause wear or damage over time. ROOFER rates pipe and mechanical supports resting directly on the membrane without a protective pad as a defect, with more severe ratings when equipment is fastened through the membrane without properly sealed penetrations.
Traffic patterns matter too. Service routes to HVAC units and other rooftop equipment tend to concentrate foot traffic – and the occasional dropped tool – into the same narrow paths. These areas should be inspected separately from the open roof field for punctures, membrane wear, and other signs of repeated traffic.
Signs of moisture intrusion, starting inside
A thorough inspection begins before anyone reaches the roof. ROOFER instructs the survey team to walk the building perimeter at ground level and examine the interior ceiling beneath the roof deck.
There is a good reason for starting there. The location where water becomes visible inside a building does not always line up with the point where it entered the roofing system. Water can travel along the roof assembly, decking, insulation, or structural components before appearing inside.
“About 50% of the time, the source of the leak is somewhere other than where the water appears inside.”
- Ivan Prokopets, Owner & CEO, Washington Weather Shield
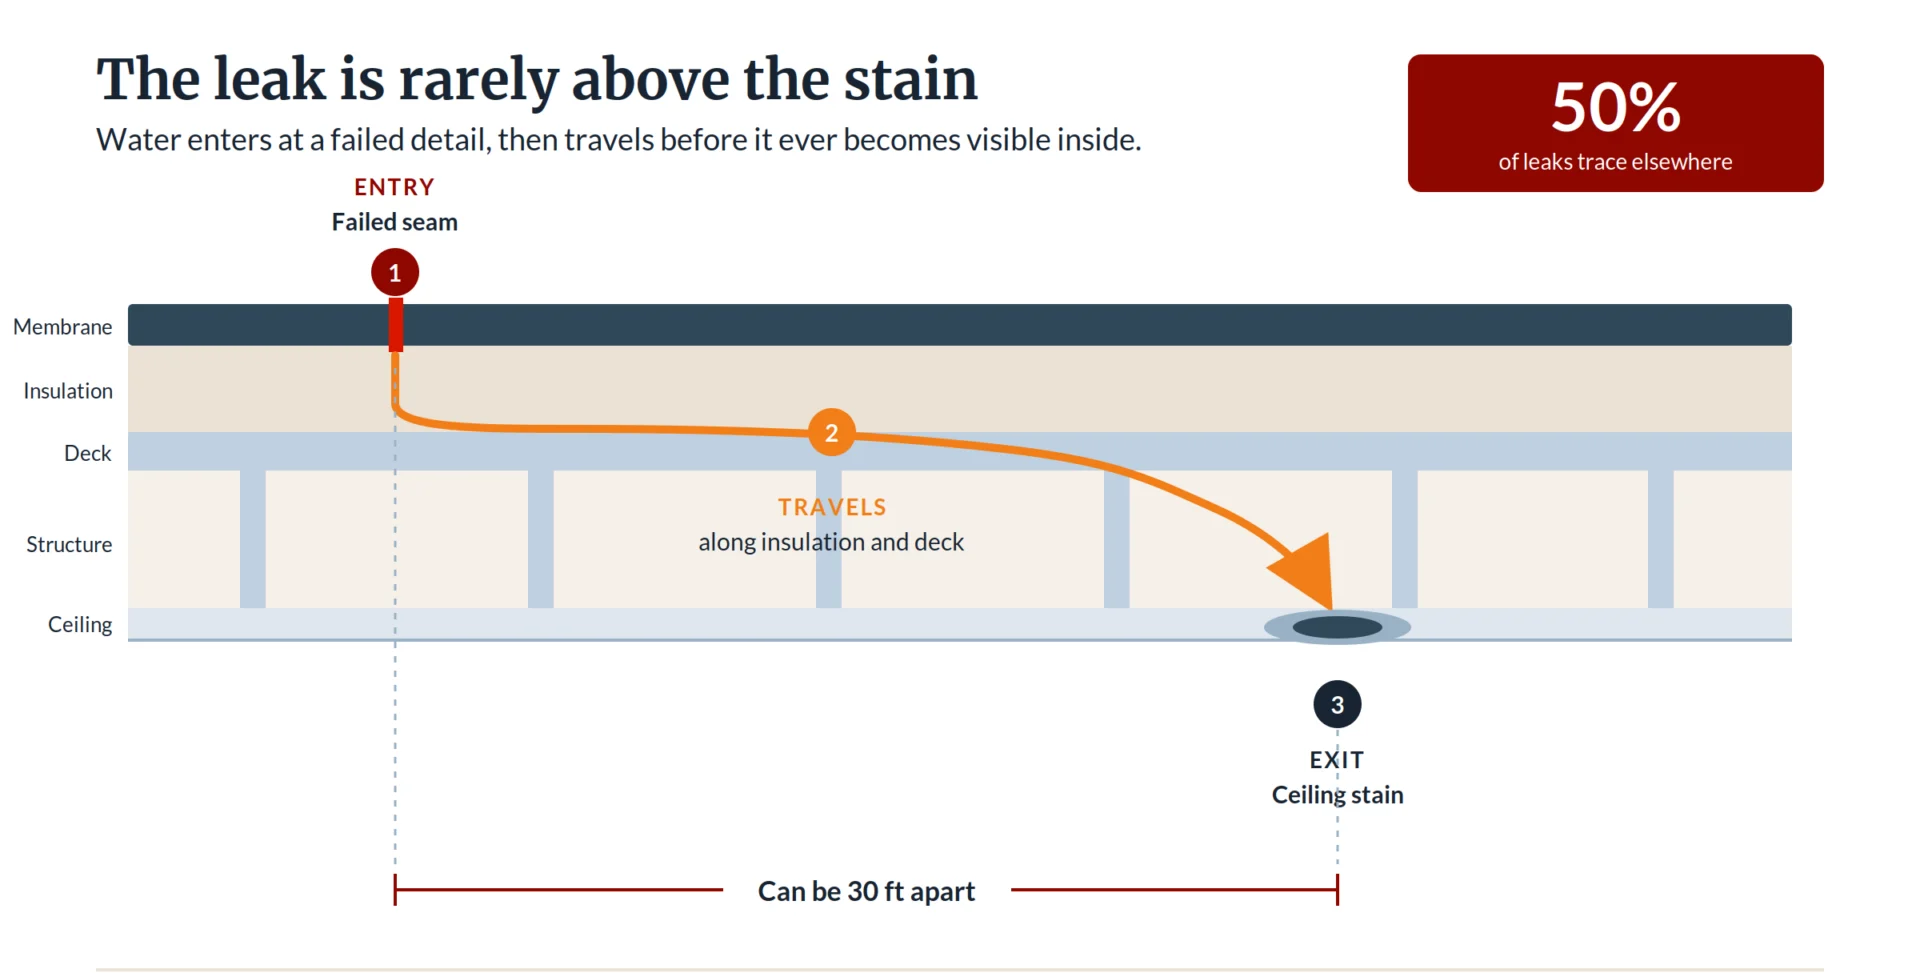
Water travels along decking, insulation, and framing before it becomes visible. The stain marks an exit point, and treating it as the entry point is how owners pay for a repair that never stops the leak.
Commercial roof inspection checklist
Use this as a scope check against any proposal you receive. A commercial roof inspection checklist should cover all six groups below, not the roof surface alone.
- Interior and perimeter: ceiling below the deck, interior walls, ground-level perimeter walk, known leak locations and dates.
- Drainage: roof drains, scuppers, gutters and downspouts, low areas holding water past 48 hours.
- Membrane: punctures, splits, blisters, shrinkage, surface wear, prior repairs and patches.
- Seams: openings measured and rated, edge laps, field welds.
- Flashings and edge metal: base flashings, roof-to-wall transitions, counterflashing, coping, fascia, sealant condition.
- Penetrations and equipment: pipe boots, pitch pans, curbs, expansion joints, equipment supports, unsealed fasteners.
When a visual inspection is not enough
A visual survey tells you what the surface is doing, but it cannot tell you what is trapped underneath. We move to additional testing when a visual inspection cannot confirm the extent of trapped moisture or the condition of the underlying system. That question turns urgent once an overlay or coating is on the table. A new system over an old one only works if the old one is sound.
How inspectors check for moisture below the surface
When we suspect hidden moisture, a professional commercial roof inspection may include one or more of these methods:
- Infrared moisture scanning: Performed at night, when the roof releases heat absorbed during the day. Temperature differences can help identify areas where moisture may be trapped below the surface. An infrared scan can show where to investigate further, but it cannot tell you where the water originally entered.
- Electrical impedance testing: Uses a non-destructive scanner to map possible moisture within the roofing system without cutting into it. It is useful for checking larger areas, but like infrared scanning, it does not identify the exact cause of the moisture.
- Core sampling: A small section of the roofing system is removed so the inspector can confirm the roof layers, materials, and moisture condition at that location. Core samples can also be used to verify areas identified by moisture scanning.
Why this matters before an overlay or coating
Before recommending an overlay or coating, we need to know that the existing roofing system is dry enough and structurally suitable to remain in place.
Core sampling also confirms how many roofing layers are already installed, which can affect whether another layer is allowed. Because those requirements vary by jurisdiction, we verify the applicable local code before recommending a recover.
Inspection methods compared
| Method | What it detects | What it cannot tell you | When it is warranted |
| Visual survey | Surface distresses, seam openings, flashing and sealant condition, ponding, equipment defects | Trapped moisture below the membrane, layer count, insulation condition | Every inspection, routine and post-storm |
| Infrared scan (ASTM C1153) | Subsurface moisture patterns, imaged at night | Cause of moisture or its point of entry | Suspected wet insulation, and before any coating or overlay decision |
| Electrical impedance survey (ASTM D7954) | Moisture in the roofing system without cutting it | Cause of infiltration, though it can help trace toward ingress | Non-destructive moisture mapping across large areas |
| Core sampling | Layer count, materials, insulation moisture by gravimetric analysis | Conditions outside the sampled location | Verifying scan results, and confirming substrate before recover |
How protocols vary by roof type and building use
Low-slope membrane roofs
On low-slope TPO, PVC, and EPDM roofs, we focus closely on drainage, membrane condition, seams, flashings, and penetrations. HVAC units, vents, drains, and other penetrations are common points of vulnerability and should each be inspected individually.
Because these systems are designed with relatively low slope, even minor drainage issues can contribute to ponding water. We look at how water moves across the roof, where it collects, and whether drains, scuppers, and surrounding areas are functioning as intended.
Metal roofs
Metal roofing systems have a different set of potential failure points. Inspections should include fasteners, seams, panel connections, sealants, and signs of corrosion or movement caused by repeated expansion and contraction.
Transitions deserve particular attention. Ridge and eave details, sidewalls, penetrations, and areas where metal transitions to another roofing material or meets rooftop equipment are all common places for water intrusion to develop.
We also look for loose or backed-out fasteners, deteriorated sealant, corrosion, open seams, and other conditions that could allow water into the system.
Occupied buildings
For an occupied building, the inspection needs more planning around people and access. We coordinate roof access, tenant notifications, and safety zones before the visit so the inspection can be completed without unnecessary disruption. Washington rules may also require a written fall protection plan depending on the fall hazard.
On larger or more complex roofs, we may divide the roof into separate sections based on factors such as:
- changes in roof height or roofing system
- expansion joints
- areas with different levels of rooftop traffic
- different building uses below the roof
ROOFER also recommends dividing large, open roof areas into sections of roughly 25,000 to 40,000 square feet.
This helps us assess each part of the roof on its own. If one section is failing while the rest is still in good condition, the inspection can identify that clearly instead of making the entire roof appear to need the same level of work.
Five types of commercial roof inspections and when each applies
Not all commercial roof inspections answer the same question, and the trigger sets both what the inspector looks at first and what you receive afterward.
| Type | What triggers it | What the inspector is looking for | What you receive |
| Routine | Scheduled cadence, typically ahead of the wet season and after it | Drainage function, seam and flashing condition, maintenance items | Condition report with severity-rated findings and a maintenance list |
| Post-storm | High wind, prolonged heavy rain, or debris impact | New displacement, lifted edge metal, punctures, blocked drains | Dated findings with photos suitable for an insurance file |
| Pre-purchase | Property acquisition or lease commitment | Remaining service life, layer count, deferred maintenance, warranty status | Condition assessment with a capital outlook |
| Leak investigation | Active water intrusion reported inside | Entry point rather than the visible stain, often with moisture scanning | Traced source, repair scope, and interim protection if needed |
| Warranty compliance | Manufacturer maintenance requirement or an upcoming claim | Documented condition against warranty terms, unapproved alterations | Records package for the warranty file |
Pre-purchase reviews are the ones most often skipped, and skipping one carries real money with it. A roof with two existing layers and wet insulation is a different asset than the same building with one sound layer. That difference belongs in the negotiation.
How often should a Seattle commercial roof be inspected?
NRCA’s general consumer guidance calls for twice-yearly inspection, though that guidance is written in homeowner terms.
For most commercial buildings in this region, twice a year is a practical baseline: once before the wet season and again after winter. Older roofs, roofs with recurring problems, or buildings that have experienced major storms or rooftop work may need additional inspections.
For Seattle buildings, a scheduled commercial roof inspection in late summer or early fall helps clear drainage and address small issues before the 27.59 inches of rain that typically fall from October through March. A second inspection in early spring can identify damage or moisture problems exposed during the wet season.
July, when Seattle averages just 0.78 inches of rain across 5.4 days, can also be a practical window for completing repair work identified during an inspection.
| Window | Why this window | What gets priority |
| Late summer to early fall | Prepare the roof before 73% of annual rainfall arrives | Drains, scuppers, gutters, sealant, small punctures |
| Early spring | The full wet season has exposed weak areas | Seams, flashings, moisture intrusion, deferred repairs |
| Mid to late winter, if needed | Useful after repeated storms or when active problems appear | Wind damage, lifted edge metal, ponding, active leaks |
| After any significant weather event | Damage is easiest to document while it is fresh | New displacement, punctures, blocked drainage |
Inspection findings should lead to action. Repairs, drainage cleaning, sealant work, and other maintenance items should be added to an ongoing commercial roof maintenance program so small issues are addressed before they become larger problems.
What your inspection report should tell you
A good inspection report should be actionable. Findings should be documented with clear locations, photographs, an explanation of the issue, and a recommended next step.
Severity should be objective rather than instinctive, and ROOFER rates each distress low, medium, or high against written criteria. Where more than one severity level appears in a localized area, the inspector assigns the highest level to the whole area. Medium and high severity distresses get marked on the roof itself and logged by ID number on a roof plan. The repair crew then finds the same defect the inspector did.
Just as important is what the report does not recommend. We sometimes review proposals that include replacing gutters, fascia, cap metal, or other components that are still serviceable and could potentially be cleaned, repaired, or reused.
“A good inspection should clearly separate what actually needs attention from optional upgrades.”
- Ivan Prokopets, Owner & CEO, Washington Weather Shield
That distinction should be clear in writing. If a report identifies multiple deficiencies without prioritizing them, it can be difficult for an owner to distinguish an urgent repair from preventative maintenance or an optional improvement. A useful report should help you make that distinction and budget accordingly.
What happens after a problem is found
Inspection findings usually fall into three groups:
- Immediate issues: active leaks or openings that need temporary protection right away.
- Scheduled repairs: problems that should be fixed during the next suitable dry-weather window.
- Ongoing maintenance: smaller items that can be added to the regular roof maintenance schedule.
Good documentation matters beyond the immediate repair. Manufacturer warranties may include specific inspection, maintenance, and documentation requirements, so building owners should keep records of roof inspections, cleaning, repairs, and other required maintenance for the life of the warranty.
Regular inspections also make long-term budgeting easier. Instead of reacting to an unexpected leak or roof failure, owners can see which repairs need funding now, which can wait, and when a larger coating, overlay, or full tear-off and replacement may need to enter the capital plan.
FAQs
What happens during a commercial roof inspection?
A commercial roof inspection starts by identifying the existing roofing system, number of roof layers, and overall condition. The inspector then evaluates key areas such as drainage, membrane condition, seams, flashings, penetrations, roof-to-wall transitions, previous repairs, and rooftop equipment.
The building perimeter and interior may also be reviewed for signs of water intrusion or other conditions that can help identify the source of a problem. Findings should be photographed and documented with clear recommendations. If trapped moisture or damage below the roof surface is suspected, additional testing such as infrared moisture scanning or core sampling may be recommended.
Why do I need a commercial roof inspection?
A commercial roof inspection helps determine what your roof actually needs before you commit to a repair or larger roofing project. Depending on its condition, the appropriate next step may be routine maintenance, targeted repairs, a coating, an overlay, or a full tear-off and replacement.
Regular inspections can also help identify small problems before they become more expensive and provide documentation that may be important for manufacturer warranty compliance, insurance claims, and long-term capital planning.
What to look for when inspecting a commercial roof?
Some of the most important areas to inspect include drainage, seams, flashings, sealants, penetrations, roof-to-wall transitions, previous repairs, and rooftop equipment.
Inspectors should also look for ponding water, punctures, splits, loose or deteriorated materials, backed-out fasteners, damaged equipment supports, and other conditions that could allow water into the roofing system. The exact inspection process will vary depending on whether the building has a TPO, PVC, EPDM, metal, coating, or other roofing system.
What are the 4 types of inspection?
Commercial roof inspections generally fall into several categories, including routine preventative inspections, post-storm assessments, leak investigations, pre-purchase or property-condition inspections, and warranty-related inspections.
The purpose of the inspection determines how detailed it needs to be and whether additional testing or documentation is required.
What is a roof inspection?
A commercial roof inspection is a structured assessment of the condition of a building’s roofing system. It typically includes the roof surface, drainage components, seams, flashings, penetrations, perimeter details, rooftop equipment, and other areas where deterioration or water intrusion may occur.
More importantly, an inspection should result in a clear recommendation. Building owners should understand what needs attention now, what can be monitored or maintained, and whether a larger roofing project should be planned for the future.
If you need a professional commercial roof inspection in the Greater Seattle area, Washington Weather Shield can provide a written condition report with photographs, findings, and recommended next steps that can be shared directly with building ownership or management.
Call 206-504-1500 or email info@waweathershield.com to schedule an inspection.
References
American Society for Testing and Materials. 2023. ASTM C1153, Standard Practice for Location of Wet Insulation in Roofing Systems Using Infrared Imaging. https://store.astm.org/c1153-23.html
American Society for Testing and Materials. 2021. ASTM D7954/D7954M, Standard Practice for Moisture Surveying of Roofing and Waterproofing Systems Using Non-Destructive Electrical Impedance Scanners. https://store.astm.org/d7954_d7954m-15ar21.html
Bailey, David M., U.S. Army Engineer Research and Development Center. 2010. Membrane and Flashing Condition Indexes for Modified Bitumen Roofs: Inspection and Distress Manual (ERDC/CERL TR-10-5). https://apps.dtic.mil/sti/pdfs/ADA518899.pdf
National Oceanic and Atmospheric Administration, National Centers for Environmental Information. 2021. U.S. Climate Normals 1991-2020, Seattle Sand Point WSFO, WA. https://www.ncei.noaa.gov/products/land-based-station/us-climate-normals
National Roofing Contractors Association. Consumer Advisory Bulletin Issue 4: Maintenance. https://nrcawebstorage.blob.core.windows.net/files/nrca_website/documents/technical/Consumer-Advisory-Bulletin-Issue-4-Maintenance.pdf
National Roofing Contractors Association. Consumer Advisory Bulletin Issue 1: Roof System Warranties. https://nrcawebstorage.blob.core.windows.net/files/nrca_website/documents/technical/consumer-advisory-bulletin-issue-1-Roof-System-Warranties.pdf
Washington State Department of Labor & Industries. 2024. Chapter 296-880 WAC, Unified Safety Standards for Fall Protection. https://lawfilesext.leg.wa.gov/Law/WACPDF/WAC%20296%20%20TITLE/WAC%20296%20-880%20%20CHAPTER/WAC%20296%20-880%20%20COMBINEDCHAPTER.pdf