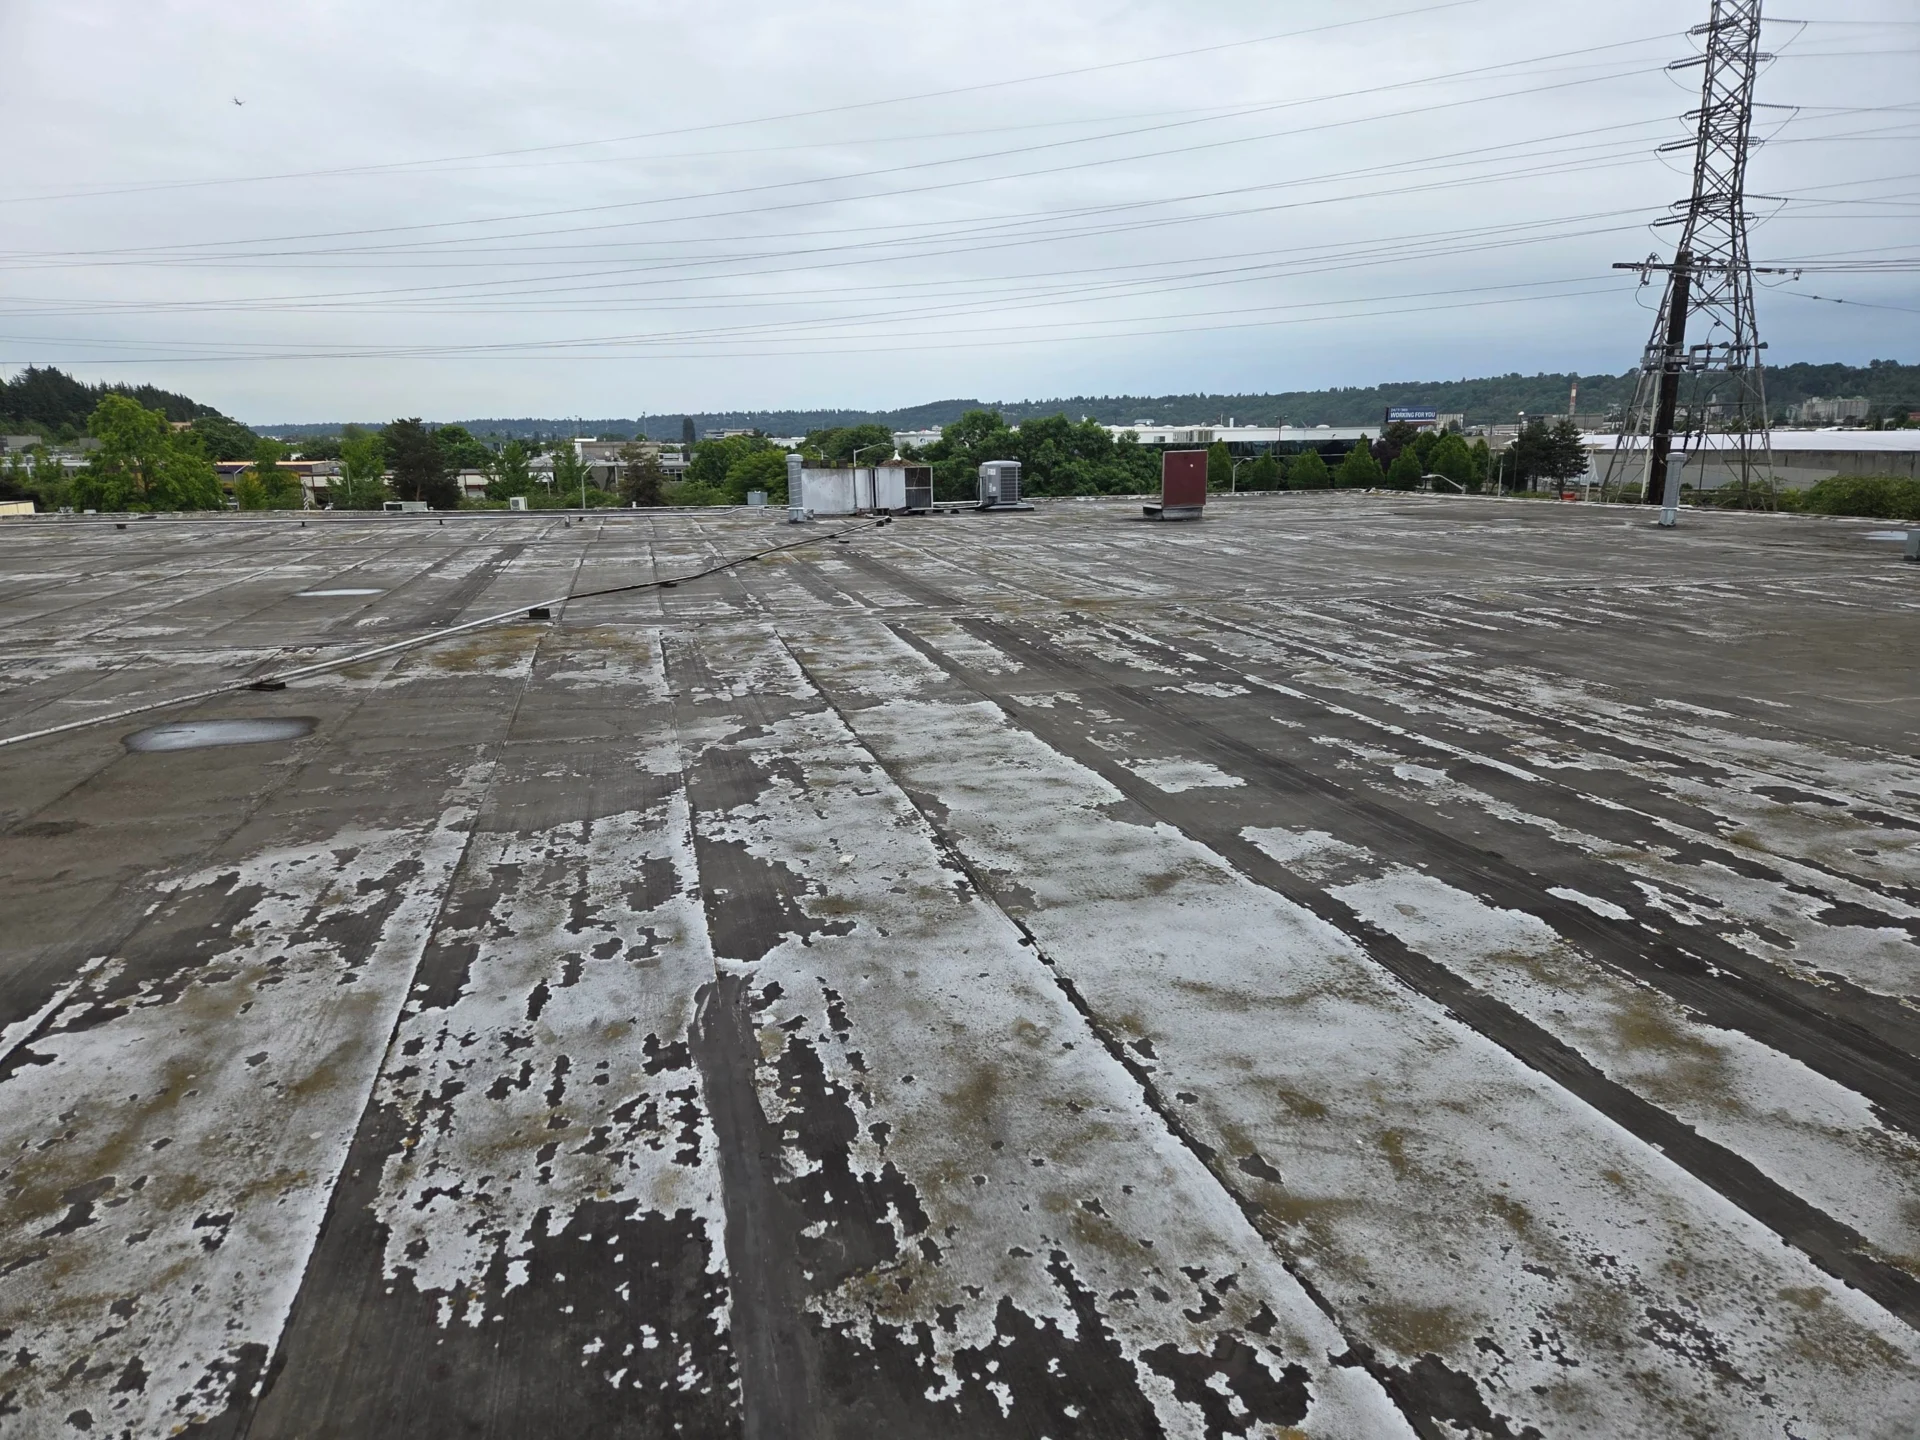
A tenant calls about a stain spreading across a ceiling tile: the first visible sign of a leaking roof. The natural assumption is that the problem is directly above it. On a low-slope commercial roof, however, the point where water appears inside the building may be some distance from where it actually entered the roofing system.
Water can travel through insulation, along roof decking, and around penetrations before becoming visible inside. That can make commercial roof leaks difficult to diagnose without inspecting both the interior symptoms and the rooftop conditions. Finding the actual source—not just the location of the drip—is the first step toward making the right repair.
Key takeaways
- On a low-slope commercial roof, the interior stain is often not below the entry point. Water can travel within the roofing assembly before becoming visible inside.
- Protect the space below, document what you see, and stay off the roof. Temporary fixes from the inside make diagnosis harder.
- Most commercial roof leaks start at details such as seams, flashing, drains, and equipment curbs, not in the open field of the membrane.
- If moisture has reached the insulation or other components of the roofing assembly, the extent of the damage should be evaluated before repairs are made.
- A roof leak does not automatically mean the entire roof needs to be replaced. The appropriate repair depends on the source of the leak and the overall condition of the roofing system.
What to do in the first hour of a leaking roof
When a commercial roof leak is first discovered, the priority is to protect the space below and gather information that can help your roofing contractor locate the source.
Protect the space below
Start by moving people, inventory, equipment, and other valuables away from the affected area. If water is near lighting, electrical equipment, outlets, or panels, keep people clear of the area and contact the appropriate building or electrical professional. Avoid standing beneath sagging or water-damaged ceiling materials.
Where it is safe to do so, use buckets or other containers to collect dripping water and protect surrounding floors and furnishings. Restrict access to the affected area as needed until the source of the water can be evaluated. The U.S. Environmental Protection Agency’s mold remediation guide for schools and commercial buildings covers occupant relocation and off-hours cleanup scheduling. Both matter more in a tenant’s space.
Document what is happening
Photograph and film where the water is appearing, along with the affected ceiling, walls, and anything damaged below. Note when the leak was first noticed and the weather conditions at the time. Details such as heavy rain, wind-driven rain, or whether the leak continues after the rain stops can help your roofing contractor narrow down the potential source.
“We recommend documenting where and when the water is coming in, protecting the area below, and avoiding getting on the roof or attempting temporary repairs.”
Rita Prokopets, COO, Washington Weather Shield
Avoid sending facility staff onto a wet roof. Wet surfaces can be hazardous, and an incorrect temporary repair can cause additional damage or make the leak harder to diagnose. Protect the interior and leave the rooftop inspection to a qualified roofing contractor.
What to have ready when you call
A few details can help your roofing contractor diagnose the leak more efficiently:
- Where the water is showing up inside the building
- When it started
- Whether it only happens under certain weather conditions
- Photos or video of the affected area
- Any history of previous leaks or repairs in that part of the roof
Previous repair history is especially helpful. If the same area has leaked or been repaired before, let your contractor know before the inspection.
Why the water you see isn’t always where the roof is leaking
The most expensive assumption in a leaking roof response is that the stain marks the source. On a house with a steep roof and an open attic, that is close to true. On a commercial building, this is not always the case, for two separate reasons.
It may not be the roof at all
Not every leak that appears below a roof originates in the roofing membrane. Water can enter through coping, flashings, wall transitions, parapet walls, siding, or vents, then travel through the building assembly before becoming visible inside.
Mechanical and plumbing sources should also be considered. Rooftop HVAC units have condensate lines and drain pans, while plumbing and sprinkler systems may run above the ceiling. A thorough inspection helps determine whether the water is coming from the roofing system or another building component.
How far water travels before it shows
Once water gets beneath the roofing membrane, it can travel through insulation or along the roof deck before finding a place to enter the building. That means the stain or drip inside may mark where the water exits the roof assembly—not where it originally entered.
Diagram from our guide to roof damage on Seattle commercial buildings.
“About 50% of the time, the source of the leak is somewhere other than where the water appears inside.”
Rita Prokopets, COO, Washington Weather Shield
ASTM C1153, the standard practice for locating wet insulation using infrared imaging, makes an important distinction: identifying moisture within a roofing system does not necessarily identify where that moisture entered. Finding wet insulation and locating the source of a leak are two different parts of the diagnostic process.
What causes a leaking roof on a commercial building
Most commercial roof leaks do not start in the middle of an open roof. They start at the details: penetrations, drains, HVAC curbs, parapet walls, skylights, expansion joints, and transitions between roof elevations. That is where materials meet and move.
Here are the causes we find most often on low-slope roofs, with the interior symptoms each one tends to produce.
Failed seams
Every single-ply membrane roof is a field of sheets joined at seams, and the seam is the weak point. TPO and PVC (two thermoplastic membranes) use heat-welded seams that hold up well in ponding, but a poor weld fails just the same as a poor adhesive bond. EPDM (a synthetic rubber membrane) relies on seams bonded with tape and adhesive. Those bonds grow more likely to separate as the roof ages, especially under prolonged standing water.
Inside, you see a stain that grows with each rain, often in a line rather than a spot. On the roof we find an open lap, a missing T-joint patch where three sheets meet, or a weld that lifts under a probe.
Flashing, coping, and parapet walls
Parapet wall flashing is the most common leak and callback detail we see across the industry. Coping cap seams get installed without sealant, with the wrong sealant, or with sealant that has worn out. Parapet walls that were never sloped toward the roof hold water on top, and that water works down into the wall assembly.
A property manager can spot the early signs from the ground or a window: cracked or missing sealant at coping seams, and flashing that has pulled loose. Standing water on top of a parapet and visible gaps where metal components meet are the other two signs. Inside, this usually shows as staining at the perimeter of a top-floor space or running down an exterior wall.
Clogged drains, debris, and ponding water
Low-slope roofs drain through internal drains and through scuppers, the openings in a parapet that let water exit to a downspout. Leaves, moss, and needle litter block both. Once water cannot leave, it ponds, and ponding water finds every weak seam and low fastener head on the roof. Undersized drains, poorly placed scuppers, and roofs built without enough slope make it worse.
Seattle’s extended periods of wet weather make proper roof drainage especially important. The Washington State Climate Office at the University of Washington analyzed hourly observations at Sea-Tac from 1990 through 2010. It found that continuous precipitation events lasting 24 hours or longer occur almost five times a year on average. The longest recorded event ran 59 hours in November 1999, with 53-hour and 54-hour events also on record. A roof that is not draining can sit under uninterrupted rain for two full days, several times each wet season. No dry window opens for a patch to set.
We recommend cleaning drains and scuppers twice a year: late fall after leaf drop, and late winter before the spring rains.
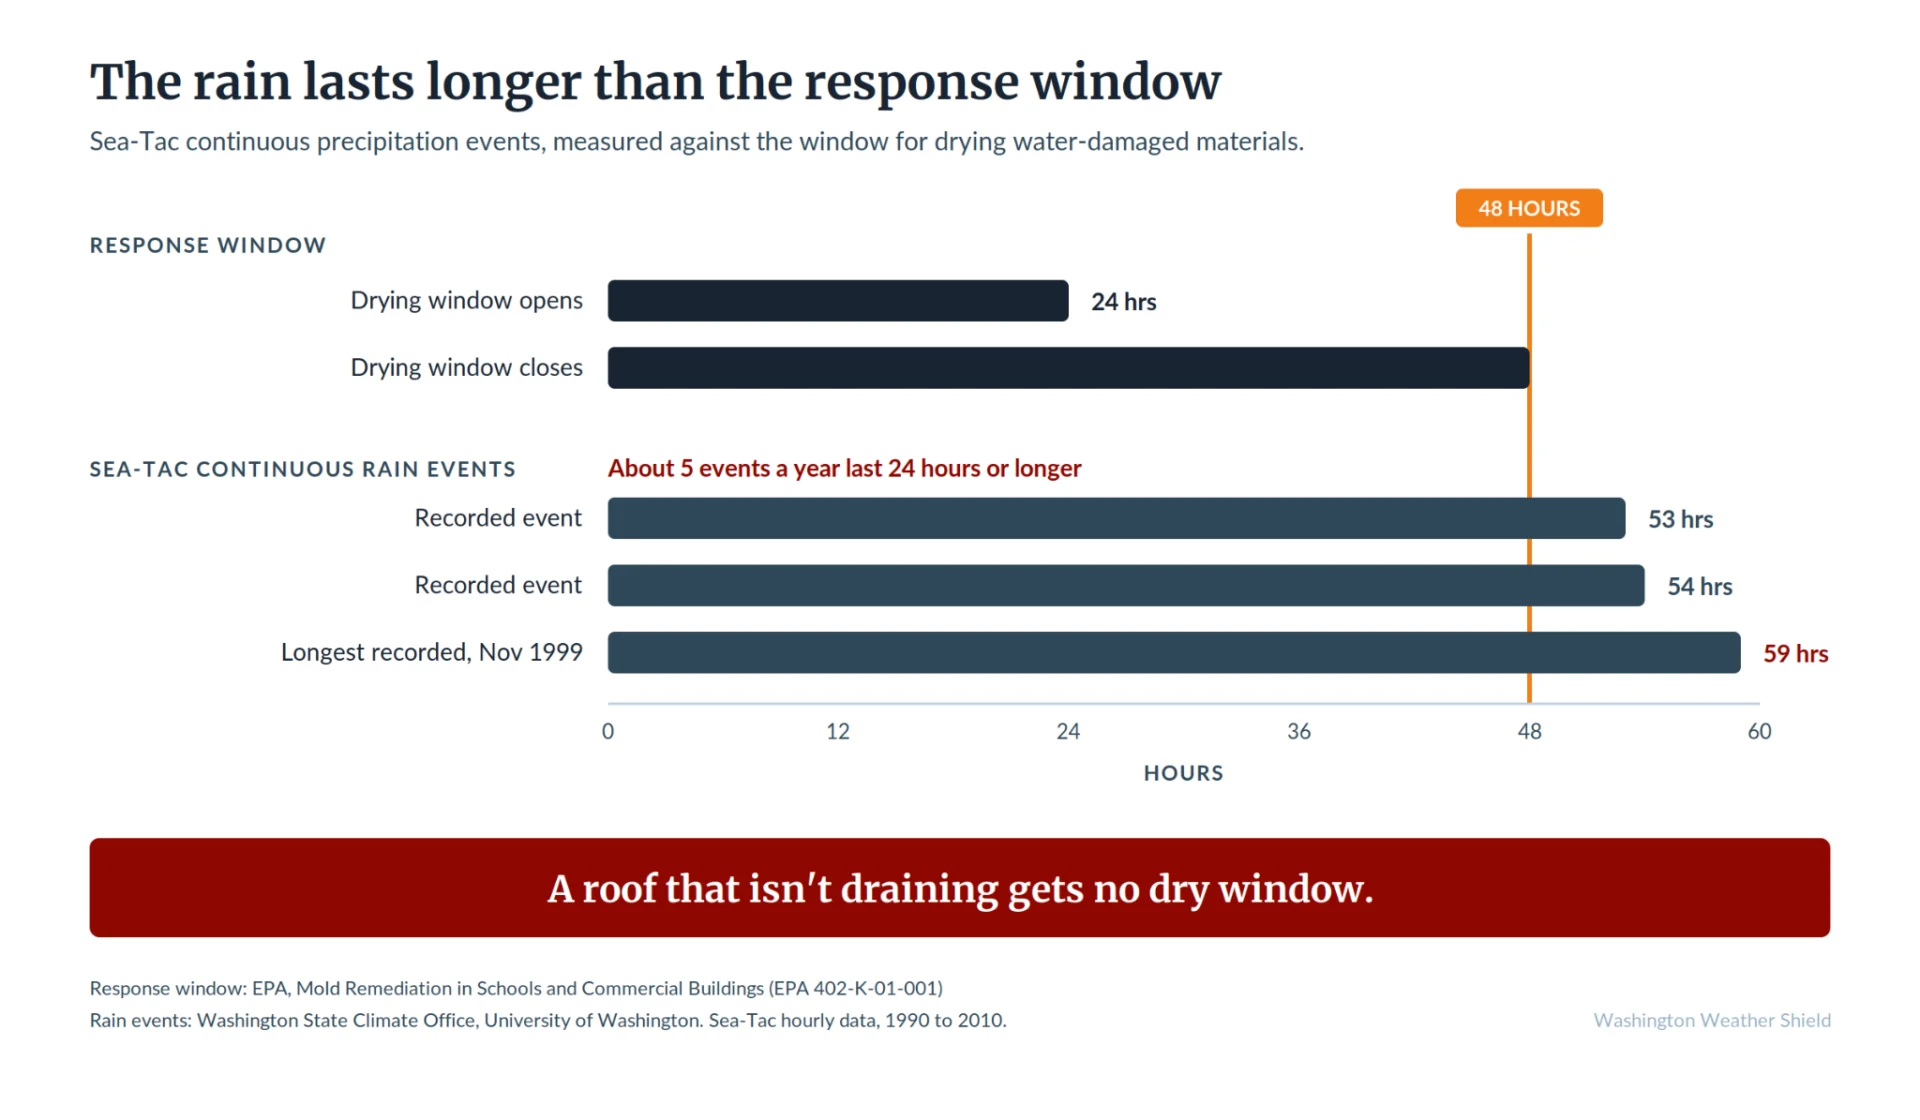
EPA sets a 24 to 48 hour window for drying water-damaged materials. Continuous rain here regularly runs past it.
Membrane punctures and foot traffic
A dropped tool, a screw left on the surface, or a service tech walking the same path to a rooftop unit every month can eventually puncture a membrane. These holes are small and often invisible until the surface is wet.
Rooftop equipment penetrations and HVAC curbs
HVAC, electrical, and plumbing work can be a common source of penetration leaks. Equipment gets added or serviced, and the membrane or flashing around the curb (the raised frame the unit sits on) can be punctured, cut, or left improperly sealed. We find small holes, damaged flashing, unsealed penetrations, and membrane wear around rooftop equipment.
This is especially relevant on commercial buildings. The U.S. Energy Information Administration’s 2018 Commercial Buildings Energy Consumption Survey found that packaged air-conditioning units serve 43% of commercial buildings. When rooftop equipment is serviced or replaced, work around curbs and penetrations can affect the roofing system. If you’ve recently had HVAC, electrical, or plumbing work performed on the roof, let your roofing contractor know when reporting a leak.
Saturated insulation
Once water gets beneath the membrane, it can saturate the insulation below. Wet insulation can lose thermal performance, retain moisture against the roof deck, and allow water to spread beyond the original entry point.
Patching the membrane alone may not solve the problem if the materials below are wet. Saturated insulation should be identified and, where required, removed and replaced as part of the repair.
Previous repairs that failed
When we open a spot where another contractor already attempted a leak repair, we most often find the repair addressed the visible drip rather than the entry point. We also find layers of caulk, sealant, or patch material added over the area without the underlying issue ever being fixed. Sometimes those layers hide the original source entirely.
“Most often, we find that the previous repair addressed where the water was showing up rather than where it was actually getting in.”
Rita Prokopets, COO, Washington Weather Shield
Age and end of service life
The most common actual source we find on leaking roof calls is an aging roof at the end of its service life. On older torch-down roofs (a modified bitumen system applied with an open flame) that means cracking and surface deterioration. Seams, flashings, penetrations, and sealants fail together, and water gets in at several points at once.
That fits the building stock: the 2018 CBECS data puts the median year of construction for U.S. commercial buildings at 1981. Buildings built between 1960 and 1999 account for more than half of both the building count and the floorspace. Many commercial roofs in service today are on their second or third system, over decks that have been wet before.
Symptom-to-cause quick reference
| What you see inside | Causes worth checking first |
| Stain near the perimeter of a top-floor space or exterior wall | Parapet and coping seams, wall flashing, roof-to-wall transitions |
| Stain near a rooftop unit or mechanical room | Curb flashing, roof penetrations, condensate lines, and recent rooftop work |
| Stain that follows a line rather than appearing in one spot | Seams, laps, flashing details, or the path water is traveling within the roof assembly |
| Multiple stains across a larger area | Multiple entry points, widespread moisture, drainage issues, or deterioration of the roofing system |
| Stain that appears only after prolonged rain and then stops | Ponding over a weak spot, clogged drain or scupper upstream |
| Stain that reappears after a previous repair | Previous repair aimed at the symptom or moisture within the roofing system |
| Musty odor with no visible stain | Concealed moisture above the ceiling or within the roofing/building assembly |
How leaks behave on different commercial roof systems
| System | What it is | How water may travel | Common areas to inspect |
| TPO | Single-ply, heat-welded membrane | Beneath membrane/insulation | Seams, curbs, flashing, penetrations |
| PVC | Single-ply, heat-welded membrane | Beneath membrane/insulation | Seams, curbs, flashing, penetrations |
| Modified bitumen | Multi-layer asphalt-based roofing | Between or beneath layers | Laps, flashing, splits, punctures |
| Built-up roofing | Layers of felt and asphalt | Within or beneath layers | Flashing, splits, blisters, drains |
| Metal | Standing-seam or fastened panels | Along or beneath panels | Seams, fasteners, flashing, penetrations |
| EPDM | Single-ply rubber membrane | Beneath membrane/insulation | Seams, flashing, curbs, penetrations |
The way water travels can vary by roofing system. On TPO and PVC roofs, water that gets beneath the membrane can travel through the roof assembly before appearing inside. On modified bitumen and built-up roofs, moisture can migrate within or beneath multiple layers, also making the source difficult to trace. In either case, the visible leak may be some distance from the actual entry point.
Metal roofs present different challenges. Seams, fasteners, penetrations, and flashing are common areas to inspect, and corrosion or damaged components can create pathways for water. Once water gets beneath the panels, it may travel before becoming visible inside.
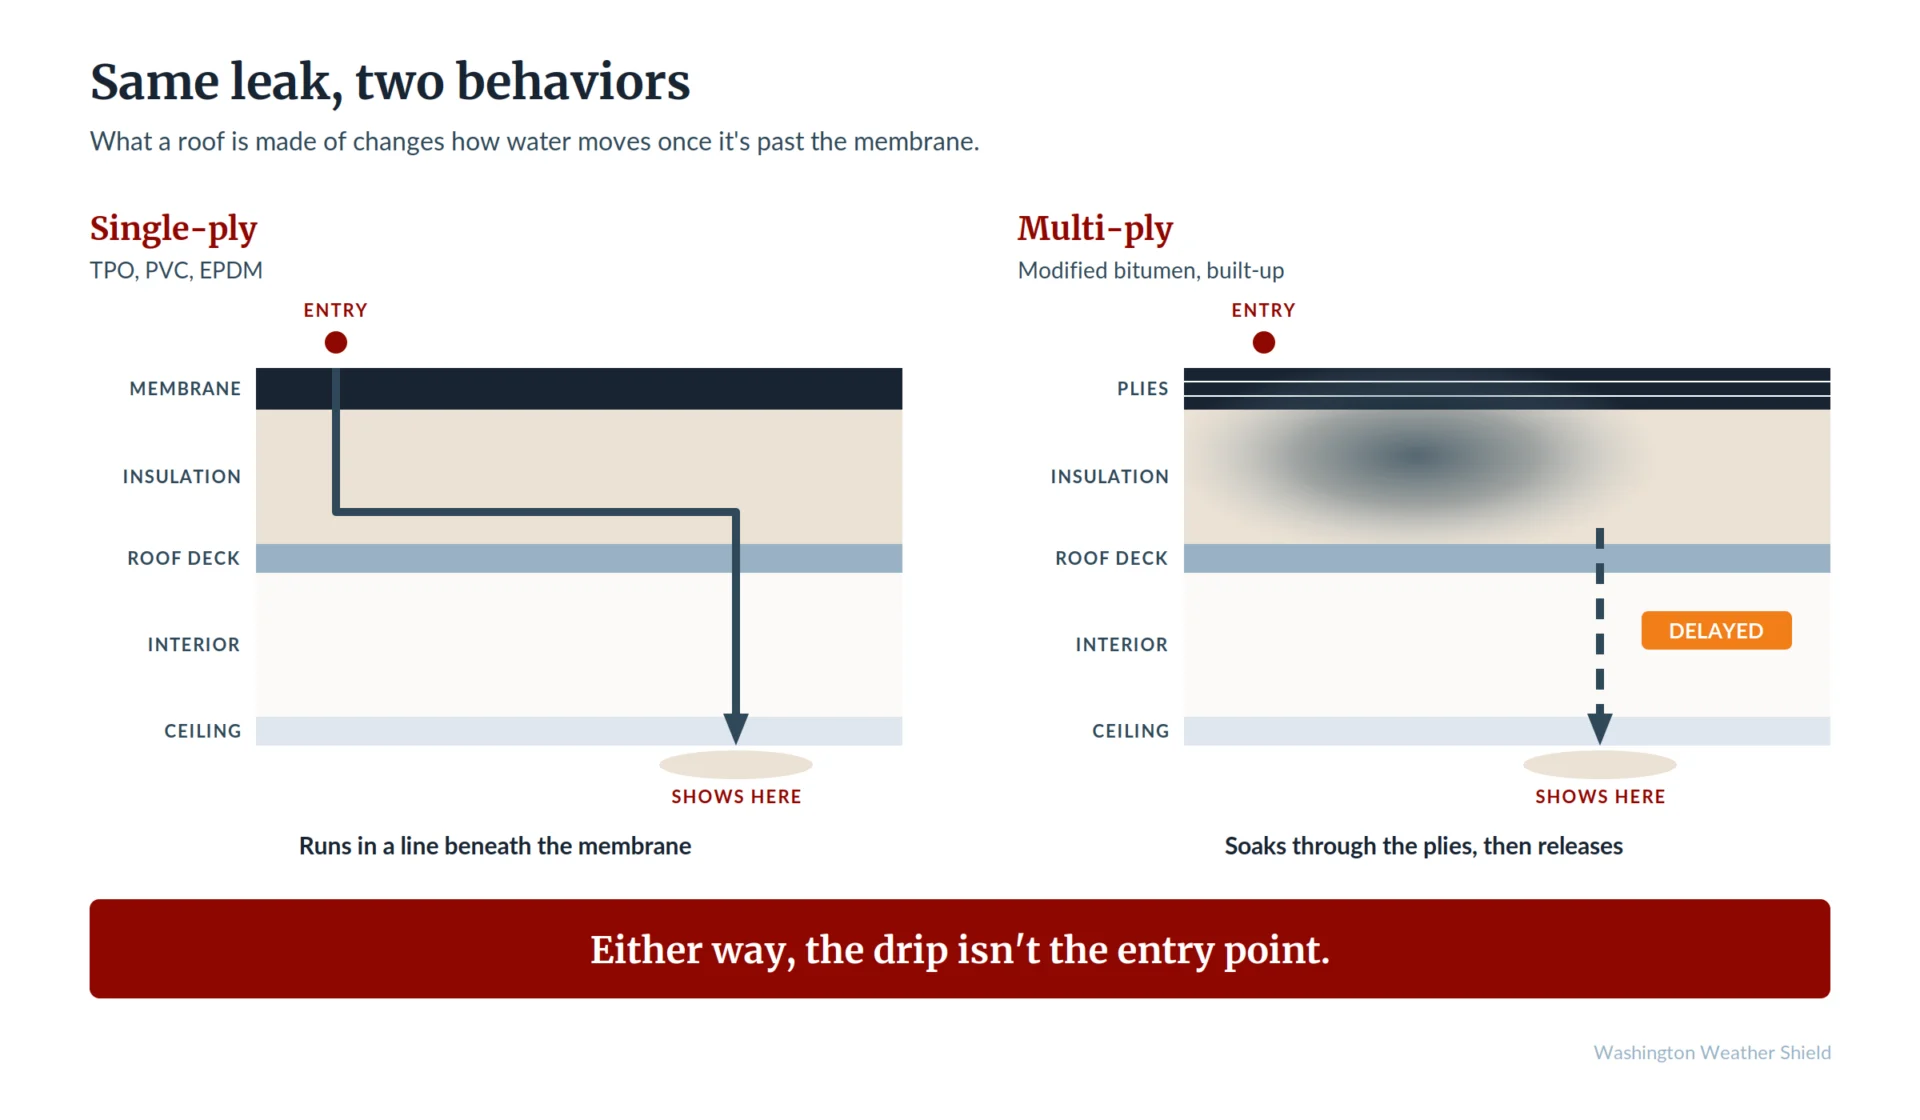
Water can travel beneath single-ply membranes or migrate within multi-ply asphalt-based systems—making the source of a leak difficult to trace.
ASTM D7877, the standards body’s guide for electronic leak detection in waterproof membranes, makes a related point. Overburden such as insulation layers, wear courses, or vegetative roofs makes leak location substantially harder. That is a standards body confirming what we see in the field. The more layers between the membrane and the deck, the further water travels before anyone sees it.
ASTM D7877, the standard guide for electronic leak detection in waterproof membranes, notes that overburden such as insulation, wear courses, or vegetative roofing can make locating a leak significantly more difficult. The more complex the roof assembly, the harder it can be to trace an interior leak back to its source.
How a commercial roofing contractor finds the source
A proper leaking roof inspection follows a sequence, with each step narrowing down the source.
- Identify the system and count the layers
We start by identifying the existing roofing system, whether it is TPO, torch-down, metal, or a coating over an older roof. We also determine how many roof layers are already on the deck and assess the roof’s overall condition. That gives us the baseline for deciding which commercial roofing services make sense, whether that is routine maintenance, a repair, a coating, an overlay, or a roof nearing the end of its service life.
- Walk the details
Next, we inspect the areas where leaks most often start: drains and scuppers, seams, penetrations, flashings, rooftop equipment, and previous repair areas. These details are usually more important than the open field of the membrane because they are where materials meet, move, and fail.
- Map the interior and photograph everything
Inside the building, we trace where water from the leaking roof is appearing across ceilings and walls and compare that pattern with what we see on the roof. Because the interior stain may be far from the actual entry point, this mapping helps narrow the search. We also photograph the roof conditions, interior damage, and suspected problem areas so the findings can be clearly documented for the owner.
- Use additional testing for hidden moisture
If a visual inspection cannot show how far trapped moisture extends, we may use moisture testing or open small areas to trace saturation beyond the visible leak. Infrared scanning is another option, but it has to be performed under the right conditions. ASTM C1153 specifies nighttime testing, roofs with insulation above the deck, and defined weather conditions for a valid survey. Electronic leak detection may also be used alongside visual and infrared inspection rather than in place of them.
What a leaking roof costs you if the diagnosis waits
A roof leak can become more expensive the longer it goes unresolved. Water that gets beneath the membrane may damage insulation, decking, ceiling materials, and other building components. Continued moisture can also create conditions for mold growth.
That is one reason quick diagnosis matters. The EPA recommends drying wet, non-moldy building materials within 48 hours and notes that mold may develop even within that timeframe. Its guidance also identifies roof materials above ceiling tiles as a potential location for hidden mold.
Why the stakes change by building type
The impact of a roof leak depends heavily on what is below it. Hospitals have patients, equipment, and critical operations; schools have students and fixed schedules; warehouses have inventory; offices and retail properties have tenants, employees, and customers; and industrial facilities may have sensitive equipment and production areas.
For buildings where water intrusion could significantly disrupt operations, regular roof inspections and prompt investigation of leaks are especially important.
Repair or replace after a leak?
A leaking roof does not automatically mean the roof needs to be replaced. The National Roofing Contractors Association notes that roof leaks can result from localized problems such as loose or damaged flashings, while broader roof-system problems may require more extensive corrective work. The right approach depends on the source of the leak and the overall condition of the roofing system.
Repeated leaks, widespread deterioration, or extensive moisture within the roof assembly can make replacement a better option. In other cases, a repair, overlay, or restoration coating may still be viable. We regularly inspect roofs where an owner has been told they need a full commercial roof replacement when another option may still be appropriate. Whether an overlay or coating is possible depends on the existing roof system, moisture conditions, and substrate.
Roof leak repair done well starts with finding the actual entry point and addressing any damaged materials—not simply patching where the water appeared inside. A commercial roof repair should also take the condition of the surrounding roof into account. NRCA puts the maintenance side plainly: “Too many owners have their roof systems examined only after a leak occurs,” it writes in its consumer advisory on maintenance. Regular inspections can help identify deteriorating flashings, seams, and other vulnerable areas before they result in interior leaks.
Leaking roof FAQs
How do you fix a leaking roof from the inside?
On a commercial low-slope roof, the source of the leak generally needs to be identified and repaired from the roof side. Sealing the visible leak from below may simply redirect the water or conceal moisture within the roof assembly. Contain the water, document what you see, and have a qualified roofing contractor locate the source.
How much would it cost to fix a leaky roof?
The cost depends on the system type, the roof’s size, the source and extent of the leak, accessibility, and whether insulation, decking, or other materials have been damaged. A localized flashing repair and a repair involving wet insulation or damaged decking can have very different costs even when they produce a similar ceiling stain. The most reliable estimate comes after an inspection.
How long can you leave a leaking roof?
Not long. A leaking roof can continue moving moisture into the insulation and deck even when the visible drip slows or stops. EPA’s mold remediation guidance sets a 24 to 48 hour window for responding to clean water damage and notes that mold can still develop within that window. Every additional rain event widens the wet area and moves more moisture into the insulation and deck.
Is roof leakage repair covered by a manufacturer warranty?
It depends on the warranty and the cause of the leak. Commercial roofing warranties vary in what they cover and exclude, and requirements may include proper maintenance and documentation. Damage caused by outside factors or work performed by other trades may not be covered. Review the specific warranty before assuming a repair is covered, and keep records of inspections and routine maintenance.
What damage can a leaking roof cause?
A roof leak can damage insulation, roof decking, ceilings, walls, electrical components, and other building materials. Persistent moisture can also create conditions for mold growth and, over time, contribute to deterioration of structural materials. The extent of damage depends on how much water entered, where it traveled, and how long the leak went unresolved.
What to do if your roof starts leaking in the middle of the night?
Protect the space below, safely contain the water where possible, and move people, equipment, and valuables away from the affected area. If water is near electrical components, keep people clear of the area. Document the leak with photos or video and contact your roofing contractor. Avoid sending anyone onto a wet roof in the dark or during severe weather.
Washington Weather Shield typically responds to urgent leak calls within the same day.
Have a Leaking Roof? Start With the Right Diagnosis
A leaking roof on a commercial building in the Greater Seattle area is a diagnostic problem before it is a repair problem, and the diagnosis is where most of the money is saved or lost. If you have water coming in, or a spot that has been patched more than once, schedule a leak inspection and we will find the source, document it with photos, and give you a written scope for the recommended repair.
References
- ASTM International. (n.d.). ASTM C1153: Standard Practice for Location of Wet Insulation in Roofing Systems Using Infrared Imaging. https://www.astm.org/Standards/C1153.htm
- ASTM International. (2014). ASTM D7877-14: Standard Guide for Electronic Methods for Detecting and Locating Leaks in Waterproof Membranes. https://store.astm.org/d7877-14.html
- National Roofing Contractors Association. (n.d.). Consumer Advisory Bulletin, Issue 4: Maintenance. https://nrcawebstorage.blob.core.windows.net/files/nrca_website/documents/technical/Consumer-Advisory-Bulletin-Issue-4-Maintenance.pdf
- National Roofing Contractors Association. (n.d.). Roofing Guidelines and Resources. https://www.nrca.net/roofing-guidelines/resources
- U.S. Energy Information Administration. (n.d.). 2018 Commercial Buildings Energy Consumption Survey: Building Characteristics. https://www.eia.gov/consumption/commercial/data/2018/index.php?view=characteristics
- U.S. Environmental Protection Agency. (2001). Mold Remediation in Schools and Commercial Buildings, Chapters 3 and 4 (EPA 402-K-01-001). https://www.epa.gov/mold/mold-remediation-schools-and-commercial-buildings-guide-chapter-3
- Washington State Climate Office, University of Washington. Bond, N. (2012). Temporal Characteristics of Winter Precipitation in Washington. https://climate.uw.edu/2012/12/04/temporal-characteristics-of-winter-precipitation-in-wa/